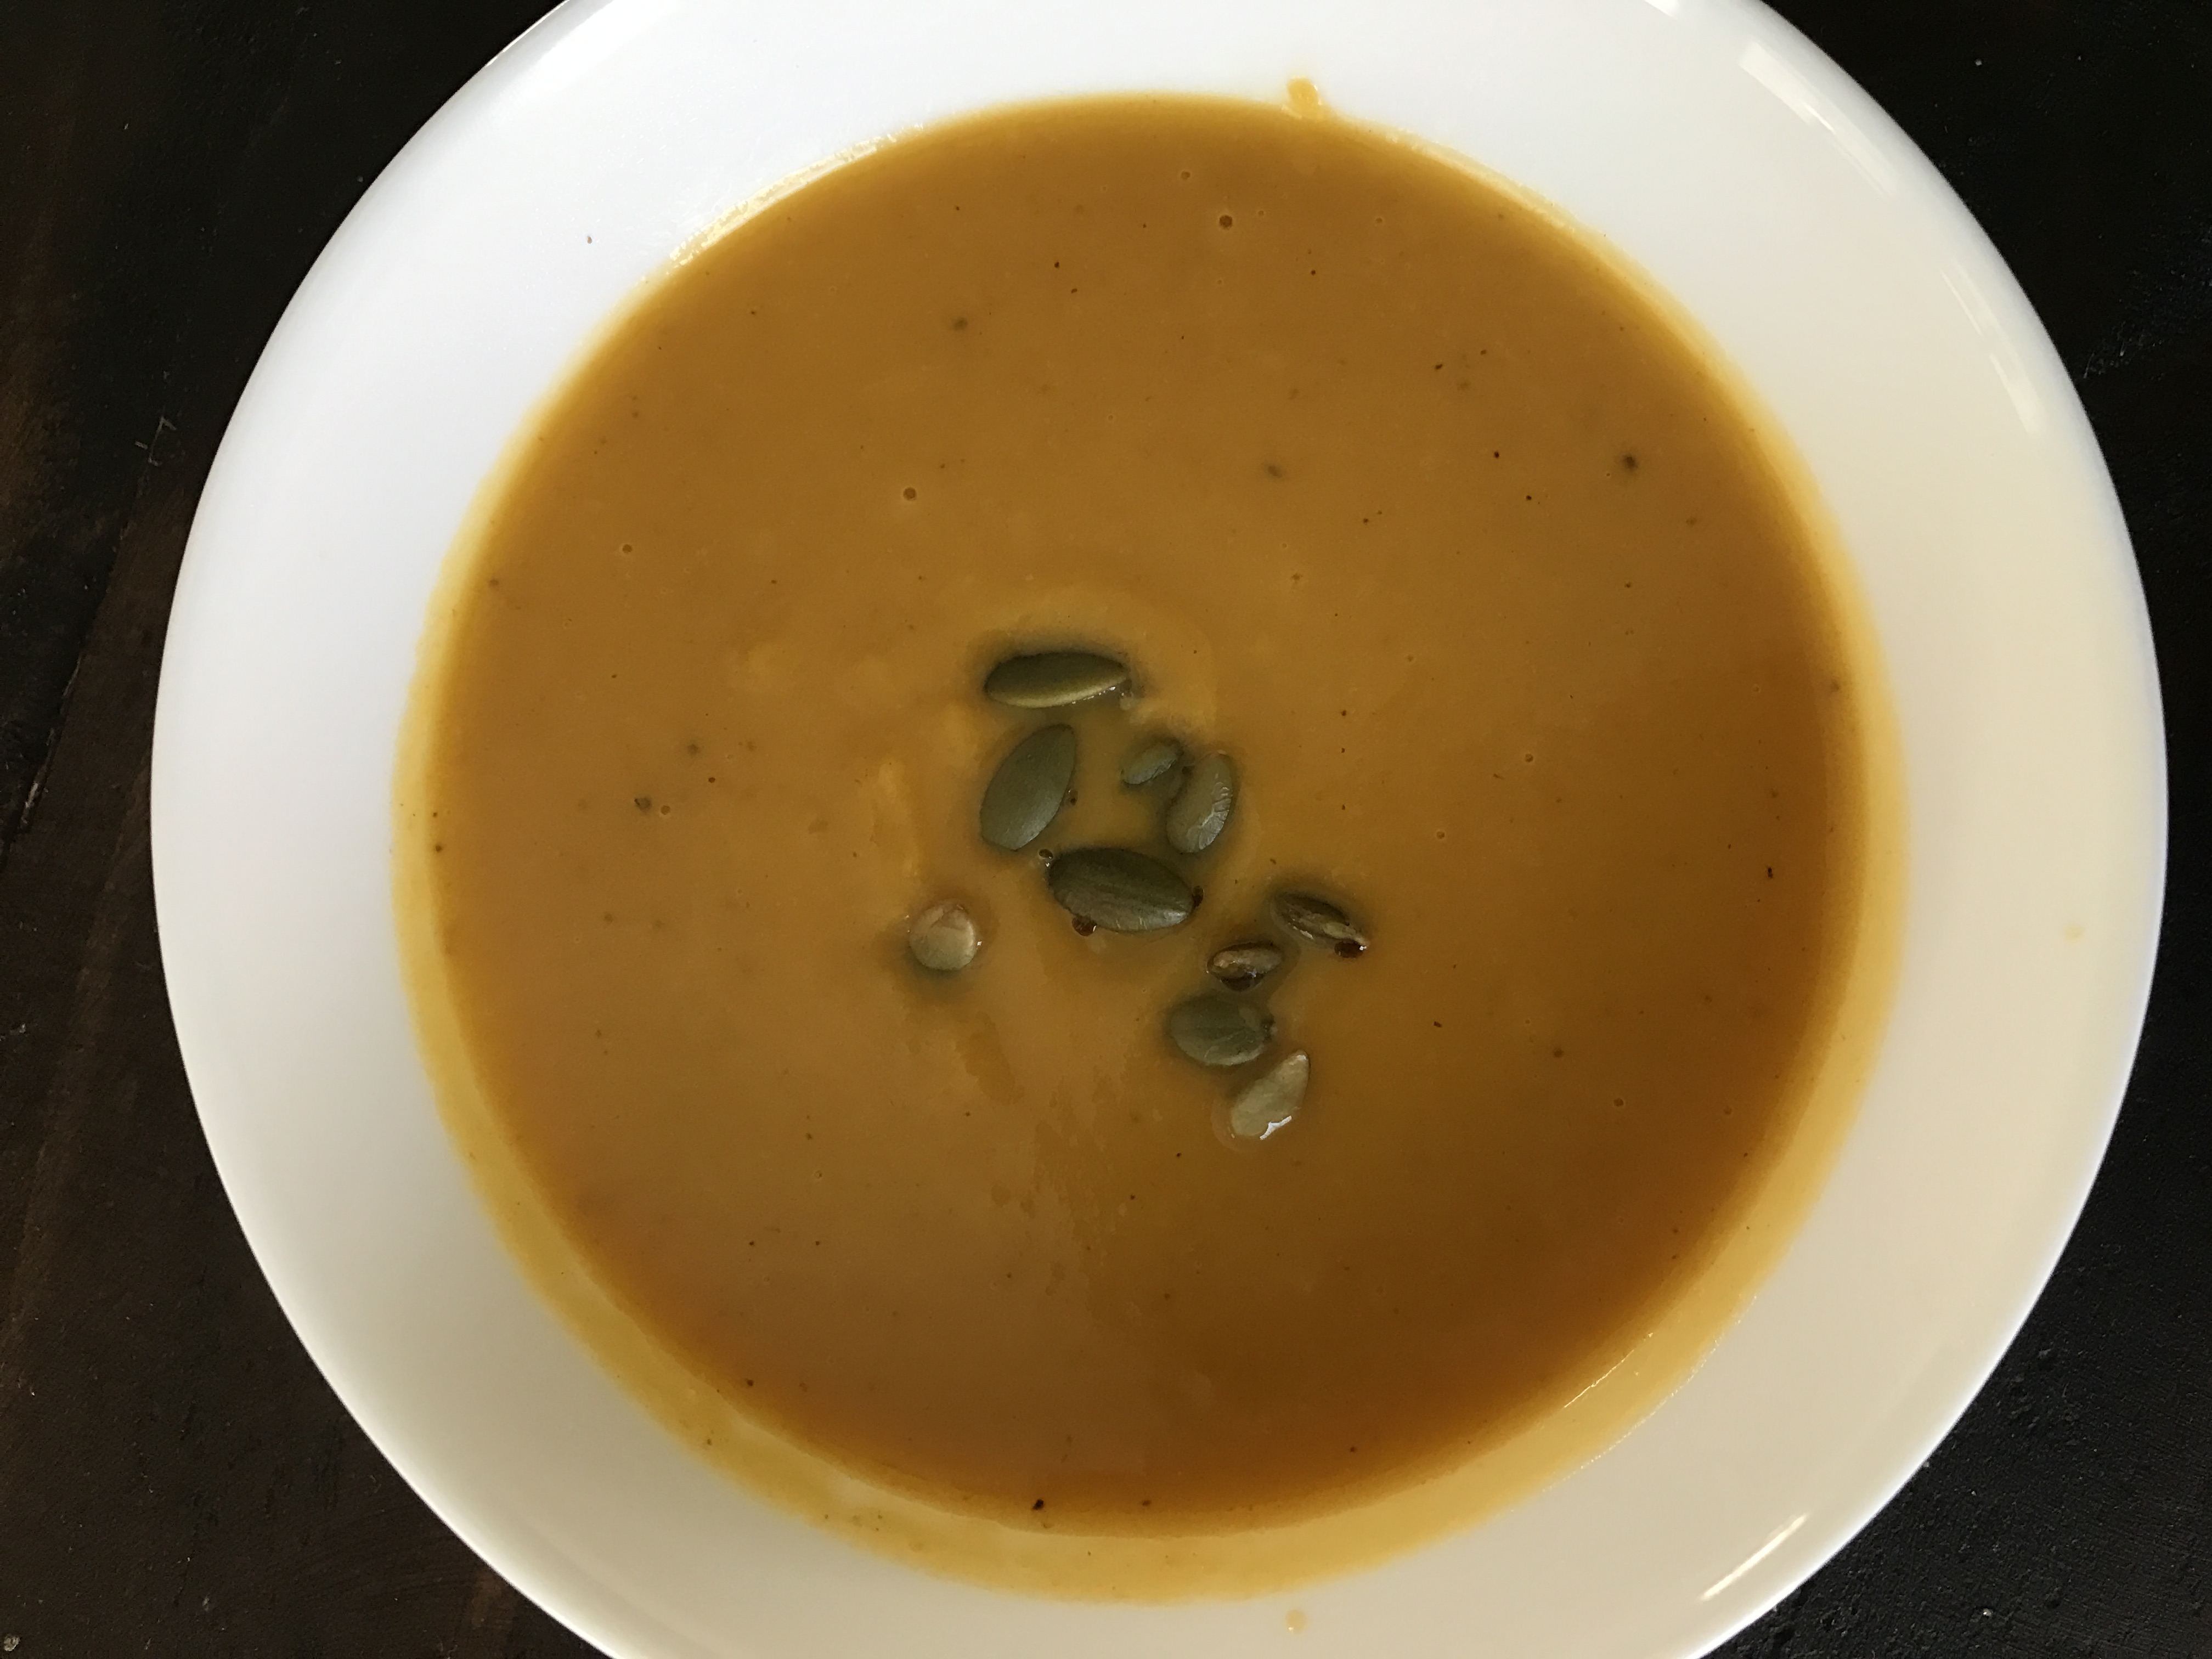
Roz Ka Khana

A blog about everyday food

Archive for the ‘Vegetables’ Category

Punjabi Samosa

with one comment

Growing up in Dehradun, Punjabi Samosa used to be a treat during the monsoon and winter weekends. One person who remains in my memory is Sitap Singh, our house help, who also dished out scrumptious North Indian dishes. As my mom mostly cooked traditional South Indian, Sitap Singh’s Punjabi dishes were always a welcome change. From soft phulkas (thin wheat tortillas) with aloo gobhi (potato cauliflower dry curry) to his famous Punjabi Samosas, his dishes were delectable. Looking back, they were sadly taken for granted. As a 9 year old boy, I used to hang around Sitap Singh while he cooked and it amazes me that these are still etched in my memory.  I still remember his tips for making samosas, and the tip about rolling the dough to a thin,  transluscent disc (almost wonton like) which adds to the crispy flaky texture. We tried this for the first time ever last weekend and were quite proud of the results. Let’s just say this one was for Sitap Singh:)

Ingredients for Samosa Crust:

Olive oil – 3 tbsps
All purpose flour or maida – 1 cup
Carom seeds or ajwain – 1/2 tsp
Water – 1/4-1/2 cup as needed for dough consistency

Method for crust:

1. Mix the flour, carom seeds, salt and oil in a mixing bowl.
2. Add water little by little and knead to a stiff dough.
3. Cover with a damp paper towl and set aside for about 10 minutes

Ingredients for filling:

Potato, 1 inch cubes 4-5 medium
Green peas, boiled 1/2 cup
Olive oil 2 tbsp
Cumin seeds 1 tsp
Ginger, chopped 1 inch piece
Green chillies, chopped 3-4
Red chilli powder 1 tsp
Dry mango powder (amchur) 1 tsp
Garam masala 1 tsp
Coriander seeds 2 tsp
Fennel seeds 1 tsp
Salt to taste

Method:

1. Take the coriander seeds, fennel, cumin seeds and crush in a mortar pestle into a coarse powder

2. Boil the potatoes and roughly chop or mash them into cubes; do not over mash the potatoes into a mushy paste.
3. Add the thawed frozen or boiled peas.
4. Add the ginger, green chilies , ground coarse powder of coriander, fennel and cumin, and the garam masala, chili powder and salt to taste.

5.Add some oil to a heavy bottomed vessel and when the oil is hot, add the potatoes peas mixture.
6. Saute for a few more minutes, then add the dry mango powder or amchur. Mix well.
7. Cool before making the samosas.
8. Divide the filling into sixteen equal portions.
9. Divide the dough into eight equal portions and roll them into balls.
10. Apply a little flour and roll them into round chapathi or small tortillas.
11. Cut into half, apply water on the edges. Shape each half into a cone and stuff it with the potato and peas filling. Seal the edges well.

12. Heat sufficient oil in a kadai (wok) and deep-fry the samosas in medium hot oil till crisp and golden brown. Drain and place on an absorbent paper.
13. Serve hot with sweet date and tamarind chutney.

Contributed by Girish Ratnam

Written by rozkakhana

August 20, 2011 at 6:17 pm

Grilled Corn with Cilantro-Chili-Lemon

with one comment

Happy 4th of July to all! It’s been an annual tradition (at least for the last 3 of the 5 years that we have been in Dallas:) to celebrate this day and the middle of summer with a picnic with our near and dear friends. We venture out to the greens with coolers, chairs, blankets, hats, sunscreen, bug spray and of course, the yummy treats doled out of all our kitchens and theirs. It’s more of a potluck, and there’s almost always something new to try and taste. I usually pick up something from the local store as it’s always a last minute trip after running a gazillion errands on Sunday afternoon. But since the 4th fell on a Monday this year, it somehow felt a little more relaxed. I thought I would make something at home for a change:) I wanted to try this dish I had seen in the July issue of the Real Simple magazine as it seemed easy enough, and I added some of my own seasoning to this recipe, which was quite the hit with the group. This dish is a tangy take on the simple grilled corn and served in bite-sized portions which makes it even easier on the palate.

Ingredients
Corn, husked and cleaned – 10
Olive oil – 2 tbsp (you can also use olive oil flavored with chili flakes for added spice)
Black pepper – 2 tsp
Salt to taste
Chopped fresh cilantro – 1 1/2 cups
Lime or Lemon juice – 1/2 cup
Garlic flakes, crushed – 2 tsp
Thai green chili, crushed (optional) – 2 tsp
Chaat masala, optional – 2 tsp (available in Indian stores)

Method:
1. Heat grill to about 350F
2. Mix the olive oil (I used flavored chili olive oil) with the salt, and garlic flakes.
3. Brush this mixture over the corn and place on the grill for about 10-15 minutes till done.
4. In a separate mixing bowl, mix the lemon or lime juice, cilantro, thai green chili, a little more salt to taste, chaat masala and combine.
5. Cut the grilled corn into about 5-6 pieces each. Toss in the mixing bowl and mix with the lemon-chili-cilantro mixture.
6. Serve with lime wedges and more cilantro for added garnish.

20110704-113309.jpg

Written by rozkakhana

July 4, 2011 at 11:36 pm

Achaari Karela (Tangy Spicy Bitter melon)

with 2 comments

As I typed the translation in english for Achaari Karela, I realized that this dish packed in almost all the flavors you can find in food – spicy, tangy and bitter. Flavors of life? Probably our thoughts too?

Before I begin to sound philosophical, the last few weeks have been a rollercoaster of emotions. A high as India lifted that world cup after 28 long years – the euphoria, the amazement and the exhaustion from staying up 9 long but nail biting hours to watch match after match. I think I had what I may call “cricket jet lag” for lack of a better word. But it was all so worth it. I am a little late in celebrating that victory here at RKK, but the excitement still lingers. Jai Ho!

Then it’s been some low, a lull from travels and long hours that added to that jet lag, which sort of explains my silence and possibly that philosophical streak:)

But it has been good to see Girish back in the kitchen after months. It probably stemmed from that euphoria of watching India live in Wankhede (that kept his spirits at a high and in getting back to cooking after ages. Either ways, it was a welcome break for all of us. Girish made this dish after trying it at Kiran’s in Houston. I’ve got to say that for a recipe that was derived half from hearsay (from Kiran herself:) and half observation, this was pretty darn good.

Ingredients:

Fennel seeds – 3 tsp

Cumin seeds – 1 tsp

Ginger – 2 inch cut into thin strips

Aamchur (Dried mango powder) – 2 tsp

Red chili powder – 1-2 tsp; as needed depending on spice level

Salt to taste

Bitter melon – cut into 1/2 inch pieces; seeds removed if needed

Milk – 1 cup diluted in 1/2 cup water

Aam ka achaar or Mango pickle, Punjabi style (aachar panchrangi, found in Induan stores) – 2 tbsp

Method:

1. Cut the bittermelon into 1/2 inch pieces. You  may remove the seeds if you don’t like the bitter taste of the melon. I retained some of it as it adds to the overall flavor, in my opinion.

2. Soak the pieces in a bowl of milk for upto 2 hours at least. This helps add some softness to the melons and also removes the overwhelming bitter taste.

3. Drain the milk after 2 hours, and keep the pieces aside.

4. Take some oil (about 1 tbsp) in a heavy bottomed vessel or kadhai, and after the oil is hot, add the fennel seeds. Saute for about a minute and then add the cumin seeds.

5. When you begin to get an aroma, in about another minute, add the ginger strips and saute again for a minute.

6. Now add the bittermelon pieces and mix well. Cook, covered on a medium low flame for about 10 minutes until the bittermelon is half cooked. This step takes time, as the melons may take some time to cook so you may need to keep watch amd cook a little longer if needed.

7. Now add some of the oil from the achaar, the aamchur powder and red chili powder and salt. Mix again and cook, covered for another 3-5 minutes.

8. Add the tbsp of achaar (mango pieces), mix and cook again for another 3 minutes. The bittermelon should be completely cooked by now and mixed well with the achaar.

9. Serve hot with hot rotis and/or rice and dal.

Written by rozkakhana

April 18, 2011 at 6:30 am

Purple Cabbage and Green Apple Salad

leave a comment »

Do you ever have one of those days when you’re out grocery shopping at a health food store like a Whole Foods or Sprouts Farmer’s Market and you load your cart with all sorts of greens and colorful fruits and veggies beacuse, well…you really want to stick to the 5 servings of fruits and veggies a day, like um..you are supposed to. You plan all these menus in your head for the week and you leave the store almost an inch taller and a pound lighter, imagining all the inches lost with the healthy menu you have planned for the family:) Until you realize that it was all in your head…the week has gone by, the fruits are getting mealy and the veggies are shriveled, and your menu well, is still in your head.

Unless, of course, you have foodie friends, like mine who go the extra mile of sharing their favorite recipes which inspire you to actually bring those menus to life. Thanks, Aparna L, for sharing this very colorful and scrumptious recipe of yours, which truly inspired me not to just visit Whole Foods but draft an entire week’s menu of leafy greens and colorful fruits. This was a part of Monday’s (today’s) dinner but I hope to stick to this planning for the rest of the week too.

Ingredients
1/4 purple cabbage shredded

1/4 green cabbage shredded

1 carrot, shredded

1/2 small de- seeded red capsicum, chopped into fine long shreds

1/2 small de-seeded green capsicum, fine long shreds

1 green apple, chopped into long 1 inch long pieces, with skin intact

2 medium sized Persimmons (optional)

1/4 cup dry roasted peanuts (crushed after roasting), add extra if you like the crunch

Dressing

1/4 cup Orange juice

salt, to taste

1/4 tsp white pepper

1/2 tsp sugar

1/2 – 1 tsp red pepper flakes

Method

Mix all the shredded vegetables in a salad bowl. Mix the ingredients for the dressing with the salt, pepper and red pepper flakes. Add this to the vegetables just before serving. Enjoy the crunchy, tangy, slightly spicy, slightly sweet salad!

Written by rozkakhana

February 14, 2011 at 11:44 pm

Aviyal (Vegetable Stew in Coconut Chili Gravy)

leave a comment »

This is one of Amma’s (my mom) famous recipes. I may have mentioned it here before, but she used to be referred to as “AP Mami” among her near and dear friends. Mami in Tamil refers to aunt and AP stood for Aviyal (vegetable stew) and Paal Payasam (a traditional Indian rice pudding or kheer). I can’t say much about the creativity of the title nor do I believe it does any justice to her incredible culinary skills, but the name stuck for a while. She became known for her Aviyal and Paal Payasam at pot lucks and other group dinners. Strangely I never really cared to learn these dishes from her growing up, and almost always took them for granted. But I never did develop a taste for Aviyal made by anyone else. And to add to this, I married a foodie, who has a similar taste (at least  with this dish, in many other cases, we are quite the opposite:), and who wouldn’t dream of having any other Aviyal but Amma’s.

Rambling aside, here’s the recipe the way Amma makes it. She refused to write it down for me so I had to watch her make it and ignore the “throw this in and add that” instructions. This is a very simple recipe and there’s just a few key things to remember as you cook this dish.

Ingredients: (to serve about 4 people)

1/4 cup beans, cut lengthwise into 1 inch pieces

1/4 cup white pumpkin cut into small quarters

5-6 drumsticks (saragava)

1/4 cup raw green plantain cut lengthwise into 1 inch pieces

1/4 cup yam cut into small quarters

1 1/2 cups grated coconut

10-12 green chilies (I use Thai green chilies, but you can use longer ones if you need to reduce the heat or deseed them)

1/2 tsp turmeric

1 cup plain lowfat yogurt, beaten

2 tbsp coconut oil

A few curry leaves

Method:

Take about 2 cups water in a saucepan, add the mixed chopped vegetables and turmeric and bring to a boil. Boil for a few minutes until cooked. Drain the water into a separate bowl and set aside. You can use this water later for the gravy if needed.

Grind the grated coconut and green chilies to a paste in a blender. You can add the vegetable water set aside (about 1/2 to 3/4 cup) to make a smooth (not too runny) paste.

Add this paste to the cooked vegetables, and add salt . Place the saucepan over a medium flame. This is the most important step to make the perfect aviyal. Make sure you are close to the stove and you are stirring frequently till the mixture comes to a light boil. Once you see the first signs of boiling, add the beaten yogurt and mix well for one more minute. Turn off the stove, add the curry leaves and the coconut oil. Enjoy with some hot white rice!

If you haven’t already noticed, Aviyal does look very similar to the vegetable stew posted earlier but is a different method. Both the dishes have their origins in Kerala though Aviyal is also a very popular dish in Tamil Nadu (states in South India). If you try both, let me know what you think of their distinct tastes.

Written by rozkakhana

January 12, 2011 at 8:20 pm

Pachadis (Chutneys) – Part 1

leave a comment »

Pachadis or Chutneys, especially the ones that are made in Andhra, the fiery hot ones with various vegetables, tomato, ginger, cilantro, mango, peanut, cauliflower (I posted this one before) are a favorite in my home. Our friend, Anitha, hails from Andhra and, in my opinion, makes the best pachadis. I’ve taken the recipes from her many times but never got around to actually trying them on my own. So when she offered one evening to come home and give me a live demo of four of her best pachadis, it was more than anything I could ask for! All she requested was that I get the ingredients ready and do a little “prep” work before she arrived. The pachadis are simple, only we were going to make four of them at once, so did need some planning.

What follows here is a step by step method of making four pachadis – kothmir pachadi (cilantro chutney), allam pachadi (ginger chutney), beerakkaya pachadi (ridged gourd chutney) and mavidikkaya kobbari pachadi (mango coconut chutney). I’ve included the traditional Telugu names on purpose as the method described is the traditional Andhra pachadi recipe.

Before starting on the chutneys, Anitha started to make a batch of fresh red chili powder and fenugreek powder.

For this, she roasted 2 (you may also use upto 4) cups of dry red chilies in about 2 tbsp of oil till they become bright red and crisp. Cool and grind to a fine powder. You need to use a powerful blender for this step, to get a smooth powder.

For the fenugreek powder, dry roast (without any oil) about 1/2cup of fenugreek seeds till light brown. Cool and grind to a fine powder.

The above powders are a staple in her kitchen apparently, and find their way into the various pachadis, vegetable curries etc, so this is an essential step before you start making the pachadis.

Cilantro Chutney (Kothmir Pachadi)

Ingredients: (for making 1 12 oz jar of chutney)

6 bunches cilantro leaves (keep the stems aside)

1/3 cup mustard seeds

1/4 tsp asafetida

1 cup tamarind paste

Turmeric powder – 1 tsp

salt to taste (4 tbsp)

6 heaped tsp chili powder

Method:

1. Heat oil in a heavy bottom vessel. Add mustard seeds, asafetida. When the mustard seeds crackle, add the cilantro leaves.Fry the leaves well until they turn a darkish brown.


2. Mix the tamarind paste, salt, turmeric and chili powder (use the fresh powder for better taste). You may add some warm water if needed.

3. Add this paste slowly to the cilantro mixture in the pan. Continue to fry/stir the ingredients until well mixed. Stir on a low flame till the mixture starts to come together.

Ginger Chutney (Allam Pachadi)

Ingredients: (for one 18 oz jar of chutney)

Ginger root – 3 large, sliced and chopped into long pieces

Dry roasted unsalted peanuts – 1/3 cup

Urad dal (Split black gram lentils) – 1/3 cup

Chana dal (Split bengal gram lentils) – 1/2 cup

1/4 tsp asafetida

Sesame seeds – 1 tbsp

Cumin seeds (jeera) – 1 tbsp

Coriander seeds (dhania) – 1 tbsp

Curry leaves – 2 sprigs

Tamarind – 3 big lemon sized balls, soaked in warm water (Note that this chutney has a longer shelf life than the other chutneys and the secret is to use warm and not cold water when blending or soaking tamarind etc.)

Brown sugar – 6 tsp

Turmeric – 1 tsp


Method:

1. Heat oil in a heavy bottom vessel. Fry the chana dal and urad dal till light brown.

2. Add the cumin seeds, sesame, coriander and peanuts and fry well.

3. Add the asafetida and about 1/2 tsp of the fenugreek (methi) powder.

4. Then add the curry leaves and the ginger pieces.

5. add about 5 tsp salt or to taste and fry till they are well mixed, about 5 minutes.

6. Now add the soaked tamarind and fry for another 5 minutes.

7. Add the brown sugar (6 tsp), 10-12 tsp of the freshly made chili powder and 1 tsp turmeric.

8. Fry for another 3 -5 minutes. Cool.

9. Grind to a smooth paste using a powerful blender. Make sure to grind in batches with some warm water to soften the ginger pieces. Alternatively, you may add some warm water to the cooled mixture in the pan and let it soak a little before grinding, to ensure a smooth paste.

Store in a dry container/jar. This chutney, when stored in the refrigerator has a shelf life of about 3-5 months.

Written by rozkakhana

April 21, 2010 at 9:57 pm

Cottage Cheese Salad

with 2 comments

I should really call this Ram Uncle’s Cottage Cheese salad, as this is his signature recipe. Rather one of his signature recipes. Ram Uncle is a dear family friend and mentor, and did I mention, an amazing cook? He is also very careful about sharing his recipes, and other than this one, I haven’t really been able to get too many recipes out of him. I think he may have shared this one with me somewhat as a parting gift (in an emotional moment:)…the family just moved from Dallas back to India. Though I’ve tried this dish a couple of times, I’m not sure I have the “Ram Uncle touch” yet:). It is one of Nikhil’s favorite dishes so I have made it several times and I’d like to share this creative, easy and quite a yummy side dish, which is also very healthy, of course, which pretty much sums up his cooking! Thank you, Uncle for this wonderful recipe.

Ingredients:

1 tub Cottage cheese (12oz tub)

1/2 medium red onion, chopped finely

1/4 red bell pepper, chopped finely

1/4 cup grated carrot

1/4 cup red cabbage grated

1 tbsp urad dal (split black gram lentils)

1 tsp black mustard seeds

1/2 tbsp yellow split pigeon peas (chana dal)

1 tsp olive oil (I think this is one of the “secret ingredients” of his. Canola or peanut oil doesn’t give the same taste as olive oil does.)

2-3 chopped green chilies (I use the Thai pepper kind)

Method:

1. Add the chopped onions, green chilies, grated carrot, chopped bell pepper to the cottage cheese and mix well in a serving container/bowl.

2. Heat the olive oil in a saute pan. Add the mustard seeds. After they crackle, add the urad dal and chana dal and saute till they turn golden brown.

3. Add the fried lentils to the cottage cheese/vegetable mixture and mix well.

The salad tastes great by itself, but if you want to try it with South Indian food, I think it goes really well with Sambar, rice and Potato Fry. Can also be substituted as a “raita” or a yoghurt based dressing in North Indian cuisine.

Written by rozkakhana

April 11, 2010 at 9:15 pm

Posted in Contributions, Vegetables

Tagged with ,

Thai Vegetable Fried Rice

with one comment

Thai Food. This was the theme at the Christmas get together at my friend, Mona’s home this past year. I offered to make something, knowing fully well I’d be making something that I’d never tried before. I’ve made Indo-Chinese (Veg. Haka noodles and Veg Manchurian) dishes before but not authentic Thai. Well, this was a challenge, kind of like a Food Blog event, so when Mona asked me if I could help with the fried rice, I was all for it. I didn’t let her know that I’d never made it before, of course..she was expecting at least 100 people:). The good news was that I wasn’t the only one making it, so to keep things consistent between the two cooks making the rice, I suggested if Mona could share the recipe with both of us. Probably a stealthy way of letting her know that I was going to try it for the first time, ever!

Anyways, she sent me the recipe as promised and I tried it the afternoon of the party. Read on to see the verdict of the Thai Veg Fried Rice that I made, thanks to Mona!

Ingredients:

3 cups cooked Basmati rice

4 nos. baby corn, sliced thin

1 large capsicum, sliced thin

2-3 tablespoons green curry paste

2-3 Thai green chillies ,chopped

1 large green bell pepper, sliced thin

Ginger and garlic paste – 1 tsp each

6 spring onions, chopped

2 tablespoons soy sauce

1 tablespoon oil (I used Wok Oil available in Asian stores)

salt and pepper to taste

Chopped basil leaves – 1/2 cup

Method:

1. Heat the wok for a few minutes, then add the wok oil. Once you hear the oil sizzle a little, add the baby corn and capsicum and stir fry for 2 to 3 minutes.

2. Add the green curry paste, chillies and spring onions.

3. Add the rice, soya sauce, salt and pepper.

4. Serve hot

You can add a little more green curry paste and soy sauce depending on how spicy you like the rice.

GREEN CURRY PASTE

Makes 1 cup.

Ingredients

10 green chillies, chopped

6 clove garlic, peeled

1 onion, chopped

3/4 piece of ginger, peeled

1 cup chopped coriander

Rind of 1 lemon, grated

Juice of 1/2 lemon

1 tablespoon ground coriander

2 tablespoons ground cumin

2 stalks lemon grass

1 teaspoon salt

1/2 teaspoon pepper

1. Grind all the ingredients in a mortar or a food processor using a little water.

2. Store in an airtight container or in the refrigerator. Alternatively, freeze for upto 3 months.

3. Use as required.

Verdict: Let’s just say I only got to taste a spoon. It was all gone at the party before I knew it! I would add a little more green chilies for additional spice, but that’s only because we tend to eat our food spicier than normal.

Written by rozkakhana

January 8, 2010 at 6:48 am

Roasted Red Pepper Spread Sandwich

leave a comment »

roasted red pepper subThis is a follow up to the recipe from yesterday on the Asparagus Soup. I served this sandwich along with the soup for lunch. Once again, this is inspired from Vegetarian Times, with a few changes. I didn’t use French baguettes but whole wheat subs. Also, I used regular cream cheese (not the vegan kind) and radish instead of radicchio and sweet and hot roasted red peppers, for some kick.

Ingredients:

  • 1 8-oz. container cream cheese, softened
  • 17-oz. jar roasted red peppers, drained well, finely chopped
  • 3 Tbs. finely minced onion
  • 1 clove garlic, minced (1 tsp.)
  • 2 18-inch whole wheat subs
  • 3/4 cup cucumber, peeled, seeded, and diced
  • 12 romaine lettuce leaves
  • 2 cups thinly sliced radish

1. Mix the roasted red peppers, cream cheese, onion, and garlic in bowl.

2. Halve each sub lengthwise. Tear out some of center from bread to make space for fillings.

3. Spread cream cheese mixture on bottom halves of bread. Top with cucumber, lettuce, and radicchio, and cover with top half of bread. 

The verdict: The sandwich turned out a little too sweet for Girish and Nikhil’s liking. I think it was because I used the sweet and hot red peppers instead of the regular roasted pepper. Will I try this again for a lunch box recipe? Of course, but with the right kind of red pepper this time!

Written by rozkakhana

June 24, 2009 at 6:31 am

Asparagus Soup

with 3 comments

asparagus soupThe last few weeks have been crazy..a rollercoaster of emotions, ups and downs..(mostly up thankfully!) amidst quite a bit of travelling. Girish and I have been cooking a lot, trying to take our mind off things. Weirdly enough, cooking has been our way to unwind. Many recipes have been tried, some a success, some not worthy to write anything about, but I have, as usual, a stash of recipes, and tons of pictures waiting to be posted. I suppose I’m not a fan of just starting off every post with “ingredients”. There’s almost always a story to every recipe or some other thought that makes this a journal. But the downside..I need to get used to rambling on my laptop as I experiment, and in doing so, be more frequent in posting.

So after over a month’s lapse , I wanted to share this Vegetarian Times recipe from last month’s issue. Asparagus is not a regular vegetable you’d find in my refrigerator, but the magazine did a great job of highlighting its benefits, and of course, our local farmer’s market did the needful in offering a discount of $1/bunch a couple of weeks ago. Perfect timing, I thought, as I put it in my shopping basket, only to forget about it for the next couple of days.  I’d like to know if this happens to everyone, but I often find myself going into a health food store with my head exploding with lunch box recipe ideas, health snacks to stash in my office drawer and the greenest of vegetables to experiment with. The minute I pay for my re-usable grocery bag brimming of healthful bounties, my short term (more like long term!)memory loss sets in. It’s often days and maybe weeks before I discover the rotten likes of romaine, green leaf, or even the fungal culture of what once used to be asparagus in my crisper.

Well, this time I was determined not to let that happen. It was weeks before I tried this asparagus soup recipe but I was “smart” enough to freeze the asparagus stems this time. I decided to try the soup and the Roasted Red Pepper Spread Sandiwch for lunch over the recent long weekend. Notice that I refrained from calling this “Fresh” Asparagus Soup unlike the title in the original source:)

Ingredients (serves 6) : 

  • 2 Tbs. unsalted butter or olive oil
  • 1 medium onion, chopped (1 cup)
  • 5 cups low-sodium vegetable broth
  • 2 lb. fresh asparagus (36 to 40 medium-size spears), tips reserved, stalks cut into 1/2-inch pieces, divided
  • 1 tsp. dried thyme
  • 1/3 cup low-fat milk or heavy cream
  • 1 Tbs. lemon juice
  • 2 tsp. grated lemon zest

1. Melt butter in large saucepan over medium heat. Add onion, and sauté 5 to 7 minutes, or until soft. Add broth, asparagus stalks, and thyme; bring to a boil. Reduce heat , cover pan, and simmer 15 to 20 minutes or until asparagus is tender.

3. Meanwhile, cook asparagus tips in salted water microwave for 1 minute. (The original recipe called for boiling but I think you get the same results in the microwave) Drain and rinse in cold water.

4. Blend the ingredients in the saucepan – asparagus, thyme, broth etc. in blender or food processor until smooth. Return to pan, and stir in milk, lemon juice, and lemon zest. Season with salt and pepper, if desired. Serve warm or at room temperature, garnished with asparagus tips.

Verdict: Could have done with a little more lemon zest. The soup is quite bland, so the lemon gives it just the right amount of tang. Will definitely make it again!

Written by rozkakhana

June 23, 2009 at 11:07 pm

Follow

Get every new post delivered to your Inbox.