Roz Ka Khana

A blog about everyday food

Archive for February 2008

Easy Masala Baked Potatoes

leave a comment »

The appetizer that I got to taste at Jayshree’s house was made with a store bought version of the roasted potato seasoning mix, like the one featured here. http://www.concordfoods.com/produce.html with some slight variations. 

Ingredients:

3-4 russet potatoesButter – 1 tsp

Olive oil – 1 tsp

Potato seasoning mix – half packet

Parsley – 1 tsp

Black pepper – 1 tsp

Garlic powder – 1 tsp

Red chilli powder – 1 tsp

Garam masala – 1 tsp 

Boil the potatoes partially. You can blanch them in the microwave for about 4 minutes. This step is not necessary but helps to keep the potatoes moist after they bake in the oven and not get “parched”. Now slice the potatoes lengthwise, like how you would for French fries.Mix all the above ingredients for seasoning, to a paste. Add the mixture to the boiled potatoes so they are evenly coated with the seasoning. Place the seasoned potatoes in an aluminium foil pan and bake at 350F for about 15 minutes. Your masala potatoes are ready! You can add any other masalas as well (chaat masala, tandoor masala) to experiment with this recipe to make your own Indian-ised version of masaledar potatoes. I forgot to take the pictures of the potatoes while in the making, but will post one of the finished product soon. Let me know if you do try other versions of this seasoning and how it turns out. 

Written by rozkakhana

February 25, 2008 at 9:33 pm

Posted in Snacks

Gujarati Khichdi-Kadhi

with 13 comments

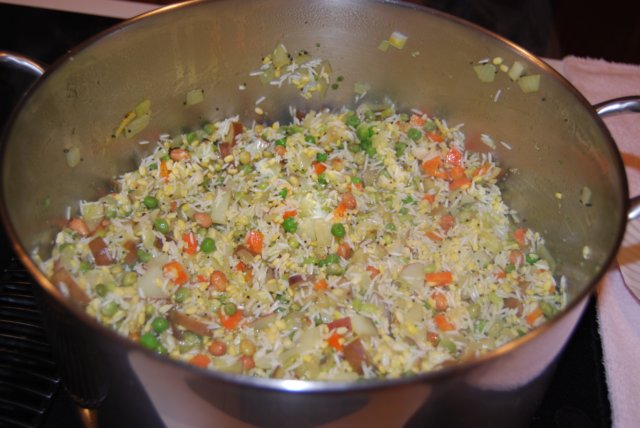
The second in our choice of comfort foods, there are many versions to the khichdi. Maharashtrian, Rajasthani, South Indian cuisines have their own twists to this comfort food. I have always enjoyed the Khichdi – Kadhi combo meal made by our Gujarati friends and so one wintry evening, I called my dear friend, Jayshree, to get the recipe. Much to my delight, she suggested we get together at her place for a Khichdi cooking lesson/dinner. I realized later that she knew me really well…this was the third time I had asked her for the recipe and had not made it yet, so she figured this was the best way to get me inspired…watch her cook it hands on! I could say, it worked… at least I wrote down the recipe to share it with everyone here and made it, well, with her as the chef! Before dinner, we also helped make some masala baked potatoes for appetizers, the recipe of which I will share too, as this meal was not only a breeze to make, but very, very tasty, and aren’t those the buzz words here – easy and tasty?

Recipe for Gujarati Khichdi (Serves 4) 

Ingredients:

Rice – 1 cup

 Moong dal – ½ cup

Oil

Cinnamon sticks – 1 to 2

Mustard – ½ tsp

Jeera – ½ tsp

Onions chopped – 1

Asafoetida – a pinch

Vegetables – potato, peas, carrots, eggplant (optional), black eyed peas (frozen or boiled), frozen tuvar dana  

5 Green chilies – crushed

Garlic paste – 1 tsp

Ginger paste – 1 tsp

Raw peanuts – ¼ cup (optional)

Cilantro chopped

Garam Masala – 1 tsp 

Soak the rice and dal for about ½ hour. Add about 1 tsp oil in a kadhai or a heavy bottom vessel. Add the cinnamon, mustard seeds and jeera. After the mustard seeds pop, add the onions and sauté for a few minutes. Add the asafoetida. Now add all the vegetables and sauté for a few more minutes. Add the crushed green chilies, the garlic paste and the ginger paste and sauté for 3 more minutes. Now add the soaked rice and dal. khichdi2.jpgYou can also add the peanuts at this time. Add about 3-4 cups water. (depending on how you like the khichdi consistency to be). Add some chopped cilantro and some garam masala. khichdi3.jpgClose the vessel with a tight lid and leave to cook for about half hour till the rice and dal are done to a nice mashed mix. You could also make this in a pressure cooker or a rice cooker. I don’t think there is a huge difference in the taste, and it’s a lot more convenient. Serve hot with a dollop of ghee, some kadhi, papad and pickle. As they say, these are Khichdi ke chaar yaars (4 friends) – dahi (yoghurt), papad, ghee and achar (pickle). We just substituted the dahi with the kadhi here!khichdi4.jpg

*Updated 2/28 – Submitting this entry for Meeta’s Monthly Mingle – Comfort Food Round-up at http://whatsforlunchhoney.blogspot.com/2008/02/comfort-food-roundup-mm-18.html#MMFeb2008

Recipe for Kadhi

Ingredients for Kadhi masala:

1-2 tsp chopped Amba haldi (also known as curcuma amada or mango ginger) – Maanga Inji in Tamil

1-2 tsp Tuvar Dana (frozen pigeon peas)

Green chilies – 2 or 3

Curry leaves – a sprig

Whole jeera (Cumin seeds) – 1 tsp

Cilantro chopped 

For Kadhi:

Yoghurt – 1 cup

Besan (gram flour) – 2 tsp

Jeera powder (cumin powder) – ½ tsp 

For tadka

Mustard seeds – 1 tsp

Jeera (cumin seeds) – 1 tsp

Red chilies (optional)

Curry leaves – a few 

Add all the ingredients for kadhi masala to a fine paste and add some salt to taste. (Since amba haldi is not always available year round, you can also make this masala in bulk and freeze it) 

Take a cup of yoghurt in a vessel and add about 2 cups of water. Add the besan to this yoghurt-water mix. Add the jeera powder and the kadhi masala. Bring this mixture to a light boil. Turn off the heat. Now take some oil in a small pan and add mustard seeds, jeera, red chillies (optional). After the mustard seeds crackle, add the tadka to the kadhi. Garnish with cilantro. Serve with the khichdi.

kadhi.jpg

Written by rozkakhana

February 25, 2008 at 8:28 pm

Posted in Comfort Food

Tagged with , , , , ,

Tomato Paruppu Rasam (Tomato and Lentil Soup)

with 3 comments

It’s like I pay my obeisance to this dish….as an almost “auspicious” start to this blog about all things food. This was the first dish I experimented on my husband as a newly married novice in the kitchen. He, on the other hand was amazed that I could cook up a concoction at all that looked edible. I have to say that was a great start to my culinary experiments, when there were such low expectations to begin with.

I can only add that it’s been a decade now and he is still “hooked”…also to the rasam, which is a good enough reason to dedicate the beginning of this blog to this dish.


I’m sure there are numerous sites and blogs out there that have a rasam recipe, but here’s my version of traditional “paruppu (dal) rasam” made in an eeyya chombu or a vessel made of an alloy of different metals, tin being the main component. The metals are supposed to have various health benefits but I use more for the wonderful taste it imparts. It is also said that a day old rasam in this eeyya chombu tastes even better, and I can confidently attest to that.

The important thing to remember is to maintain a certain level of liquid in this chombu as the alloy can melt if the vessel is placed on a flame without anything in it. Thankfully, I have not had that happen to me personally; though have heard some funny stories of my mother’s adventures with it.


Here’s the recipe of our household’s comfort food:


Tomato Paruppu Rasam


Paruppu or dal is a Tamil word and refers to tuvar dal or pigeon peas. Tomato Paruppu rasam is a tomato dal rasam (soup), also referred to as charu in other Indian languages.


Ingredients:

1 medium roma tomato, or 5 cherry tomatoes, crushed

1 cup boiled and mashed tuvar dal

1 lemon size ball of tamarind, made into pulp

½ cup chopped cilantro

2 heaped tsp of rasam powder (I typically use store bought Madras rasam powder, MTR or 777, but you can also make your own.)

Ingredients for tempering:

1 tsp ghee (clarified butter)

1 tsp mustard seeds

1 tsp cumin seeds or jeera

A pinch of asafetida


  1. Add about 2 cups of water to the tamarind pulp.
  2. Put the tamarind juice, half of the cilantro, and the crushed tomatoes in a vessel, and place over fire
  3. Add the rasam powder to this tamarind-tomato mix and let it boil, till the smell of the rasam powder goes away.
  4. Now add the dal and about 1-1 ½ cups water. Add salt to taste. Let this boil for about 5 minutes. Add the remaining cilantro. Boil for another 1-2 minutes and turn off the stove.
  5. Heat the ghee in another small pan. Add the mustard seeds, jeera and asafetida. When the mustard seeds start spluttering, add the entire contents of the pan to the hot rasam. Cover the rasam with a lid to contain the aroma.


Variation: Occasionally, I also add some dried neem leaves or “vepambu” to the ingredients for tempering. Besides having a great medicinal value, neem leaves add a distinct flavor to the rasam.


There are different ways to enjoy this rasam. Since it has dal in it, mixing the rasam while serving gives it a thicker consistency that is typically enjoyed with hot rice and ghee. Many true rasam connoisseurs also like to wait for the dal to settle down at the bottom of the vessel and decant the top liquid while serving, which can also be enjoyed like a soup.


As for my husband, he likes it not too thick, not too thin, but just right! One ladle of the top liquid, then one ladle of the mixed dal, to give it the “just right” consistency!


Written by rozkakhana

February 25, 2008 at 8:17 pm

Posted in Comfort Food

Follow

Get every new post delivered to your Inbox.